viernes, 30 de noviembre de 2012

EASY FULGURATOR

hi, fellas.
this is another entry for the how i took it contest


The idea of ​​this project is to build a projector using a flash


you can use any flash, any lens


the distance between the slide and the lens varies by this measure.


Slide example


viernes, 2 de noviembre de 2012

POOR MAN'S REFLECTOR

this is another entry to:

Greetings ladies and gentlemen.
I came across with a couple of plastic bottles in the garbage, and I had an idea.


the bottle Works as structure to hold up the aluminium foil, I found two plastic bags as well, so I used them as light diffuser.


iso100 - 30mm - f/4.5 - 1/125seg 

iso100 - 33mm - f/4.5 - 1/125seg 


This provisional reflector and diffuser can save us of some trouble situation.
That's all folks!

By the way, the camera that I used was the canon 60D with tamron 18-270mm F/.3.5-6.3 Di II VC
PZD. Lens.

These are some stuff that were used.


- masking tape, ever.
- aluminium foil.
- soda bottles.
- white translucid plastic bags, with soy sauce stains.
- scissors, razor or a sharp stone.
- wireless triggers.
- a couple of flashes:
      - Yongnuo YN460-II GN38
        - Kako net-s GN25
 - a couple of tripods.
        -canon cpv - 180
        -manfrotto 190XDB + 701HDV so versatile for photo and video.
- a beer, for that frustrating moment when things are not working as you want.
-another beer, for that moment when everything goes better than expected.

special thanks to my brother Fredy, for help me in the translation of all my tutorials.
Greetings from Peru, South America!


another entries:


martes, 30 de octubre de 2012

more control to old flashes

another entry to the

Some time ago I found a pretty old flash.

Kako net-s GN25, despite being quite old was well preserved. That which has on the side and seem intensity control is actually a conversion table, there is no way to control the intensity of the flash, always fires at full power.

I thought we could use a fader ND filter to have more control over those old lights flash to be found at garage sales.

In addition to control the intensity of light also sought some control over the dispersion so use a cardboard tube with aluminium foil inside.


Now we can control the flash output rotating the fader ND filter.

In the next picture we use the flash kako + tube with fader ND filter in an intermediate position, if we use normal flash uncontrolled blaze the background giving us a flat picture.

iso100 - 39mm - f/8 - 1/125seg

The reflections on the character's eyes are a second flash with an white umbrella behind a cardboard. is an easy way to get reflections in the eyes without extra lights.


The camera used was a canon 60D + tamron 18-270mm F/.3.5-6.3 Di II VC PZD.


some things we use in this tutorial:

- cardboard. a lot.
- tube, from chips, from toilet paper, from pipe, plastic or paper.
- aluminium foil, stolen from the neighbor's kitchen.
- masking tape.
- black tape.
- scissors, razor or something like that.
- ND fader filter, this thing is quite versatile.
- a couple of tripods, stands or something to hold flahses and camera.
- wireless triggers, unless your flashes work with black magic.
- white diffuser umbrella, with the flash behind the camera, behind the cardboard.
- flashes in picture:
        -Yongnuo YN460-II GN38
                 -  Kako net-s GN25 (old as history of photography, but still works)


how i took it 2012 contest

another entries for the contest:

- cardboard background
- Faking fireworks in table top photography


domingo, 28 de octubre de 2012

jueves, 25 de octubre de 2012

Cardboard background


This is another entry for the contest HOW I TOOK IT 2012 OF DIY PHOTOGRAPHY.


In this opportunity we are going to try to simulate the lights of a city as background for our picture.


iso100 - 110mm - f/7.1 - 1/125seg


The tutorial is perfectly scalable so we can use this to portray people, cats and who knows maybe cows.

We will use:


a - Cellophane, any color. It is not indispensable but adds color to the background.
b - Tripod, stand or something to keep up the lights.
c - Cardboard (card stock)
d - Flashes, in this case I use 2. It depends on your picture motif you can vary the configure of lights
           d.1 - Yongnuo YN460-II GN38
           d.2 - Kako net-s GN25 (very old, I am not sure if that brand still exists)
e - Wireless trigger
f - Masking tape. Never  get out of your house without this!!!
g - Scissors or something to cut the cardboard. Under the supervision of one adult, unless you are one so in that case look for the supervision of one old man.
h - Diffuse umbrella. White thin paper works too.
g - Collapsible reflector. Or something to reflect the light.
i - Something to hold the cardboard. We use folding table.

For this tutorial, we used the canon 60D with tamron 18-270mm F/.3.5-6.3 Di II VC PZD.Lens.

let's begin:

Well, the first step is to make some holes over a cardboard, vary the size of the holes,
even you can use a pin or needle to make small holes.


Next give some color to the proyect and use the cellophane to cover some holes.


Now we secure the cardboard and put one flash behind with the umbrella. Finally set up the rest of our lights.


that's it

iso100 - 110mm - f/7.1 - 1/125seg

iso100 - 184mm - f/7.1 - 1/125seg

playing with the cutting shapes you can obtain interesting results.

Thank you for your time and In one near tutorial we will learn more about marsupials.

iso100 - 119mm - f/13 - 1/80seg

iso100 - 270mm - f/7.1 - 1/200seg


How i took it 2012 contest


Español

Esta es otra entrada para el concurso How i Took it 2012 de DIY photography.


En esta ocasión intentaremos simular las luces de una ciudad como fondo desenfocado para
nuestra foto.


El tutorial es perfectamente escalable así que se puede usar para retratar humanos, gatos y quien sabe tal vez vacas.

Para ello usaremos:


a - Celofán, cualquier color. No es imprescindible pero le da color al fondo.
b - Trípode, stand o algo para sostener las luces.
c - Cartulina.
d - Flashes, en este caso uso 2. Dependiendo del motivo de tu foto puedes variar la configuración de luces.
           d.1 - Yongnuo YN460-II GN38
           d.2 - Kako net-s GN25 (sigue siendo viejo, todavía no se si la fábrica de esto aun existe)
e - Disparador de flash inalámbrico wansen genérico. Si los flashes que usas son wireless no necesitas esto, obvio.
f - Masking tape. No salga de casa sin ella.
g - Tijeras o algo para cortar la cartulina. Con supervisión de un adulto, a menos que seas adulto entonces busca la supervisión de un anciano.
h - Sombrilla difusora. Papel canson transparente también puede funcionar.
i - Reflector plegable. O algo para reflejar la luz.
j - Algo para sostener la cartulina. Yo uso una mesa plegable.

En este tutorial usamos una canon 60D con un objetivo tamron 18-270mm F/.3.5-6.3 Di II VC PZD.

Empezamos:


Como suponemos lo primero es hacer unos cuantos agujeros en la cartulina, varia el diámetro de los agujeros, incluso puedes usar un alfiler para hacer algunos agujerillos.


Luego dale algo de color al asunto y usa el celofán para cubrir algunos agujeros.


Aseguramos la cartulina y colocamos un flash con sombrilla translucida detrás. Finalmente configuramos la luz para nuestro elemento a fotografiar. Para el ejemplo quedo algo así:


Y listo:


jugando con las formas recortadas se pueden obtener algunos resultados interesantes.
Gracias por su tiempo y en un próximo tutorial aprenderemos mas sobre los marsupiales.


Fireworks background


Hi fellas, this tutorial is an entry for the contest HOW I TOOK IT 2012 OF DIY PHOTOGRAPHY.


We are going to try to reproduce a picture with fireworks as a background. It is so easy and also it can be used to shoot portrait (now that I think it can work with cats too)

To show an example I used some toys.

The final will look something like this:


iso100 - 169mm - f/6.3 - 1/60seg

let's get buzy, remember! for any new proyect we need the supervision of one responsible adult to

take the consequences if something goes wrong and we have to run away.
That being said, let see what we need:


a - Cellophane, or color filters for flash.
b - Optical fiber. Very important.
c - Masking tape.Never miss this.
d - Electrical tape (or insulating tape), preferably black.
e - Flashes, in this case I use 2. It depends, can use more or less:
                    e.1 - Yongnuo YN460-II GN38
                    e.2 - Kako net-s GN25 (too old, I am not sure if that brand still exists)
f - Wireless trigger of flash wansen generic. if the flashes that you have are wireless, you
will not need this obviously.
g - bouncer, or something like this. White cardboard works well.
h - Tripod or stand, something to keep up the lights.
i - Optionally, we can use cardboard but we will talk about it later.
j - Passport. Documents ready if something goes wrong and we got to flee the country.


For this tutorial, we used the canon 60D with tamron 18-270mm F/.3.5-6.3 Di II VC PZD.Lens.


Something important about the optical fiber that we are going to use is that we get it from one of those fiber lamps wich can be bought at any store or by internet.


let's start, first we will put cellophane on the flash with help of the masking tape and use the
cellphane as a color filter.

Here use your creativity, mix colors, whatever occurs to you.Remenber!the Cellophane can be melted with heat from frequent shots, and this can stain your flash. To avoid this you can use hard plastic filters or put a transparent plastic between the cellophane and the flash.


We adhere (or stick) optical fiber to the flash with maskingtape.


Now we seal the rest of the flash with black electrical tape, in that way only the light will be seen
go out by the optical fiber.


Then we test the flash. So far it looks fine.


One last test before starting to shot.


Next we put the optical fiber behind of our main element, the rests of lights can vary
according that we chose to photograph.


For this example we used one flash in half way of its power over the figure or toy and a white bouncer.


iso100 - 169mm - f/6.3 - 1/60seg


the results vary according to the focal length and the aperture that we will use.


iso100 - 42mm - f/11 - 1/60seg


Be creative and change the things for instance here we put the optical fibercloser to the figure, it looks like one bolt of lightning is hitting the figure!


iso100 - 92mm - f/16 - 1/60seg

Change the color filters.


iso100 - 246mm - f/8 - 1/125seg


For the next picture we did not use any color filter with the fiber, but we put a blue filter on the
flash that illuminate our main element.


iso100 - 70mm - f/8 - 1/125seg


iso100 - 92mm - f/8 - 1/125seg


That's all folks!, actually it is quite easy. When we vary the things a little bit you can get a really
interesting backgrounds, I hope it will be usefull for you.

In one near tutorial we will learn how to cook tandoori chiken. will not miss it.
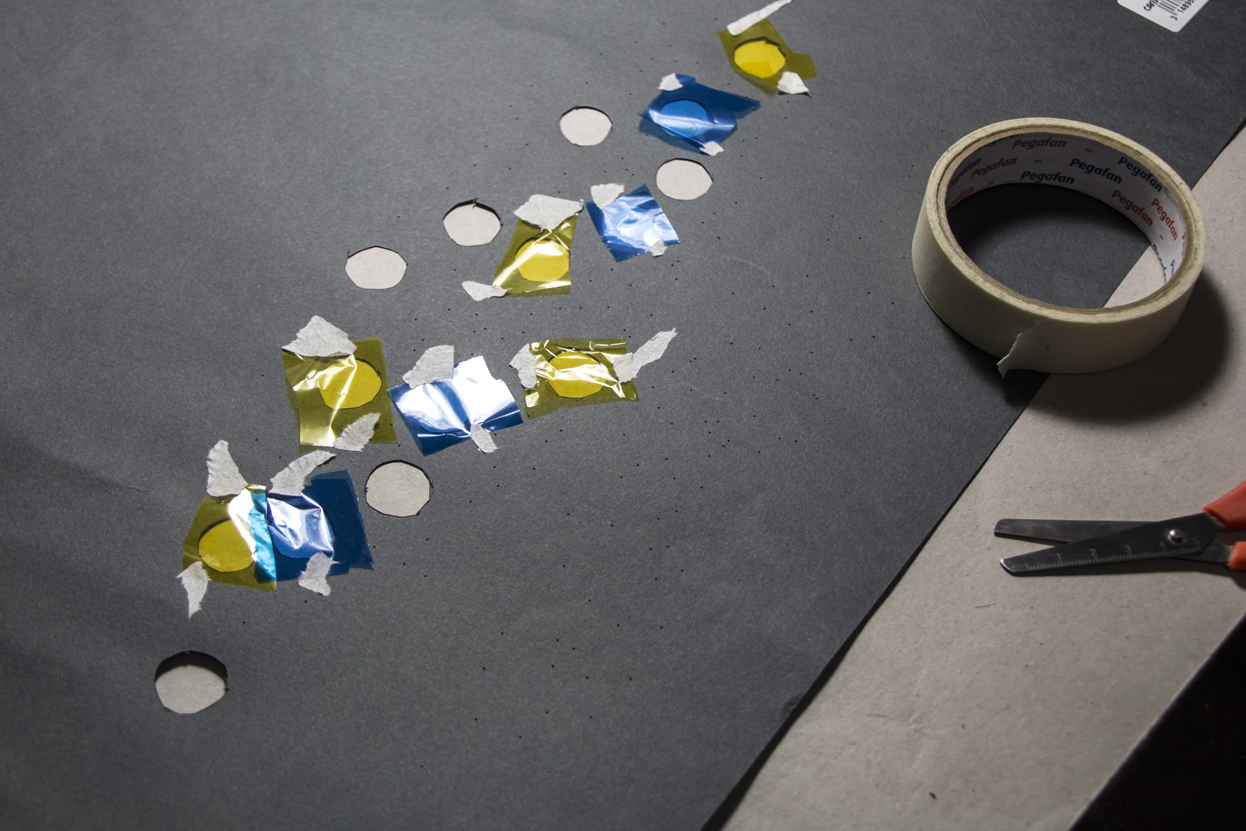
OPCIONAL / BONUS


You can have more control over the direction and the position of the lights at the background.
Make some holes on a cardboard and pass some filaments through the holes as we can see in the below picture.


iso100 - 270mm - f/6.3 - 1/125seg


How i took it 2012 contest


Español


Saludos bricomaniacos, este tutorial es una entrada para el concurso How i Tookit 2012 de DIY photography.


Intentaremos reproducir una foto con fuegos artificiales de fondo.
Es bastante simple y se puede usar para fotografiar retratos (y ahora que lo pienso también gatos)
Para ejemplo use algunos juguetes.
El resultado final es algo así:


Empezamos, recuerden que para todo proyecto nuevo necesitan de un adulto responsable que asuma las consecuencias por si algo sale mal y tienen que salir corriendo.

Habiendo dicho eso veamos lo que necesitamos:


a - Celofán, o filtros de color para flash.
b - Fibra óptica. Muy importante.
c - Masking tape. Nunca debe faltar.
d - Cinta aislante, de preferencia negra.
e - Flashes, en este caso uso 2. Dependiendo de lo que esté en tu primer plano puedes usar mas o menos.
             e.1 - Yongnuo YN460-II GN38
             e.2 - Kako net-s GN25 (bastante viejo, ni siquiera sé si esta marca aun existe)
f - Disparador de flash inalámbrico wansen genérico. Si los flashes que usas son wireless no necesitas esto, obvio.
g - Rebotador plegable, o algo parecido. Cartulina blanca funciona bien.
h - Trípode o stand, algo para sostener las luces.
i - Opcionalmente, puedes usar cartulina pero eso lo veremos luego.
j - Pasaporte. Documentos en regla por si algo sale mal y debemos huir del país.

Para el tutorial usamos una canon 60D con un objetivo tamron 18-270mm F/.3.5-6.3 Di II VC PZD.

Algo importante sobre la fibra óptica que usaremos es que la sacamos de una de esas lámparas que puedes encontrar en una tienda de adornos o en internet.


Si consigues la fibra óptica sin cortar puedes armar uno de estos del tamaño que quieras, pero como en este caso la compre hecha tiene unos 35cm de largo, como 13 pulgadas.

Empezamos, lo primero es usar el celofan como filtro de color sobre un flash con ayuda de la
masking tape.

Puedes ponerte creativo aquí, mezclar colores, lo que se te ocurra. Recuerda que el celofan puede derretirse con el calor de los disparos frecuentes, esto puede manchar tu flash. Para evitar esto puedes usar filtros de plástico duro o colocar un plástico transparente entre el flash y el celofan.


Adherimos la fibra óptica al flash con algo de masking tape.


Sellamos el resto del flash con cinta negra, así solo se verá la luz que sale por la fibra óptica.


Probamos el flash. Hasta el momento se ve bien.

Ultima prueba antes de empezar de empezar a disparar.


Colocamos la fibra óptica detrás de nuestro elemento principal, el resto de luces pueden variar de acuerdo a lo que escogimos fotografiar.

Para este ejemplo usamos un flash a mitad de potencia sobre la figura de juguete, un rebotador blanco rellena las sombras bajas de la figura.


Los resultados varían dependiendo de la apertura y distancia focal que usemos.


Se creativo y varia las cosas por ejemplo aquí acercamos la fibra óptica al juguete, se ve como si un rayo de energía lo estuviera golpeando!


Cambia los filtros de color.


En la siguiente toma dejamos sin filtro de color a la fibra óptica, pero le pusimos un filtro azul al
flash que ilumina nuestro elemento principal.


Eso es todo amigos!, bastante simple en realidad. Variando un poco las cosas puedes obtener fondos realmente interesantes, espero les sea de utilidad.

En un próximo tutorial aprenderemos a cocinar pollo tandoori. No se lo pierdan!

OPCIONAL / BONUS

Puedes tener algo más de control sobre la dirección y posición de las luces en el fondo. Perfora algunos agujeros en una cartulina y pasa atreves de ellos algunos filamentos de fibra óptica como se ve en la siguiente foto.