This is another entry for the contest HOW I TOOK IT 2012 OF DIY PHOTOGRAPHY.
In this opportunity we are going to try to simulate the lights of a city as background for our picture.

iso100 - 110mm - f/7.1 - 1/125seg
The tutorial is perfectly scalable so we can use this to portray people, cats and who knows maybe cows.
We will use:

a - Cellophane,
any color. It is not indispensable but adds color to the background.
b - Tripod,
stand or something to keep up the lights.
c - Cardboard
(card stock)
d - Flashes, in
this case I use 2. It depends on your picture motif you can vary the configure
of lights
d.1 - Yongnuo
YN460-II GN38
d.2 - Kako net-s
GN25 (very old, I am not sure if that brand still exists)
e - Wireless
trigger
f - Masking
tape. Never get out of your house
without this!!!
g - Scissors or
something to cut the cardboard. Under the supervision of one adult, unless you are
one so in that case look for the supervision of one old man.
h - Diffuse
umbrella. White thin paper works too.
g - Collapsible
reflector. Or something to reflect the light.
i - Something
to hold the cardboard. We use folding table.
For this tutorial, we used the canon 60D with tamron 18-270mm F/.3.5-6.3 Di II VC PZD.Lens.
let's begin:
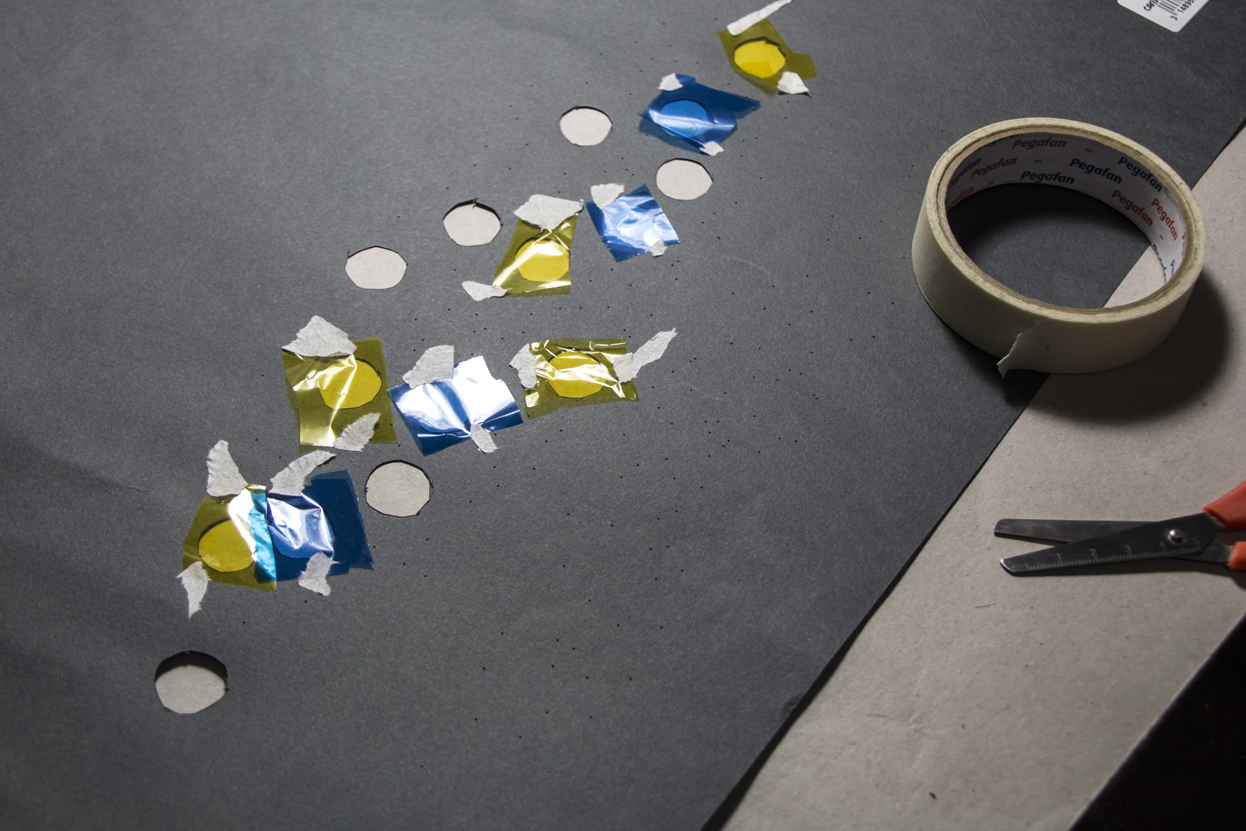
Well, the first step is to make some holes over a cardboard, vary the size of the holes,
even you can use a pin or needle to make small holes.

Next give some color to the proyect and use the cellophane to cover some holes.
Now we secure the cardboard and put one flash behind with the umbrella. Finally set up the rest of our lights.

that's it
iso100 - 110mm - f/7.1 - 1/125seg

iso100 - 184mm - f/7.1 - 1/125seg
playing with the cutting shapes you can obtain interesting results.
Thank you for your time and In one near tutorial we will learn more about marsupials.

iso100 - 119mm - f/13 - 1/80seg

iso100 - 270mm - f/7.1 - 1/200seg
How i took it 2012 contest
Español
Esta es otra entrada para el concurso How i Took it 2012 de DIY photography.

En esta ocasión intentaremos simular las luces de una ciudad como fondo desenfocado para
nuestra foto.

El tutorial es perfectamente escalable así que se puede usar para retratar humanos, gatos y quien sabe tal vez vacas.
Para ello usaremos:

Español
Esta es otra entrada para el concurso How i Took it 2012 de DIY photography.
En esta ocasión intentaremos simular las luces de una ciudad como fondo desenfocado para
nuestra foto.
El tutorial es perfectamente escalable así que se puede usar para retratar humanos, gatos y quien sabe tal vez vacas.
Para ello usaremos:
a - Celofán, cualquier color. No es imprescindible pero le da
color al fondo.
b - Trípode, stand o algo para sostener las luces.
c - Cartulina.
d - Flashes, en este caso uso 2. Dependiendo del motivo de tu
foto puedes variar la configuración de luces.
d.1 - Yongnuo YN460-II GN38
d.2 - Kako net-s GN25 (sigue siendo viejo, todavía no se si la
fábrica de esto aun existe)
e - Disparador de flash inalámbrico wansen genérico. Si los
flashes que usas son wireless no necesitas esto, obvio.
f - Masking tape. No salga de casa sin ella.
g - Tijeras o algo para cortar la cartulina. Con supervisión de
un adulto, a menos que seas adulto entonces busca la supervisión de un anciano.
h - Sombrilla difusora. Papel canson transparente también puede
funcionar.
i - Reflector plegable. O algo para reflejar la luz.
j - Algo para sostener la cartulina. Yo uso una mesa plegable.
En este tutorial usamos una canon 60D con un objetivo tamron 18-270mm F/.3.5-6.3 Di II VC PZD.
Empezamos:
Como suponemos lo primero es hacer unos cuantos agujeros en la cartulina, varia el diámetro de los agujeros, incluso puedes usar un alfiler para hacer algunos agujerillos.
Luego dale algo de color al asunto y usa el celofán para cubrir algunos agujeros.
Aseguramos la cartulina y colocamos un flash con sombrilla translucida detrás. Finalmente configuramos la luz para nuestro elemento a fotografiar. Para el ejemplo quedo algo así:
Y listo:
jugando con las formas recortadas se pueden obtener algunos resultados interesantes.
Gracias por su tiempo y en un próximo tutorial aprenderemos mas sobre los marsupiales.
No hay comentarios:
Publicar un comentario